How to Run Random Videos in MixItUp
Date: 03 December 2021
Mix It Up is a wonderful tool for streamers. It can be used as a basic chat bot but it also gives one a lot of power for throwing stuff up on an overlay. One of it’s weaknesses, however, is that it can’t tell how long a video is which makes it hard to randomly play one video after another. This little hack makes it a little easier.
It’s pretty common to want to play a random video. In MIU, this can be easily done by creating a bunch of Action Groups that have a video overlay action followed by wait action. Then you can create an Action Group that has a command for every video action you created. Flip the “Run one randomly” switch and boom! a random video plays.
That works fine for a few videos but what if you want to play a random video – or one of hundreds of videos – and don’t want to add them all manually? That’s tougher.
What I wanted to do was have MIU play through a bunch of random stream clips while I was on my BRB screen. I have a lot of clips generated and create more every week or two. I don’t want to have to add new actions and update a randomizing AG for every new clip. Fortunately, I have a small amount of programming skill which makes it (mostly) possible. (I’ll explain that “mostly” in a bit.)
The way this works is that, first, I create a file that contains a list of all the clip video files. You can do this by hand but I have a little bit of powershell that does that for me.
All of my clips are in folders like f:\creations\twitch clips 20210829-20210904\exports. What this script below, which I called
get-clips.ps1, does is search all of the directories under
f:\creations and looks for files that end in *.mp4. Those
directories also contain longer highlight videos so I exclude files
that start with highlights from the results. The list is then saved
in a file named clips.txt. You can adjust this for your organization
scheme by changing the file paths in the script.
cd f:\creations
Get-ChildItem -Path "F:\creations\twitch clips *\exports" -Recurse -Include "*.mp4" -Exclude "highlights *" | % { $_.FullName } > clips.txt
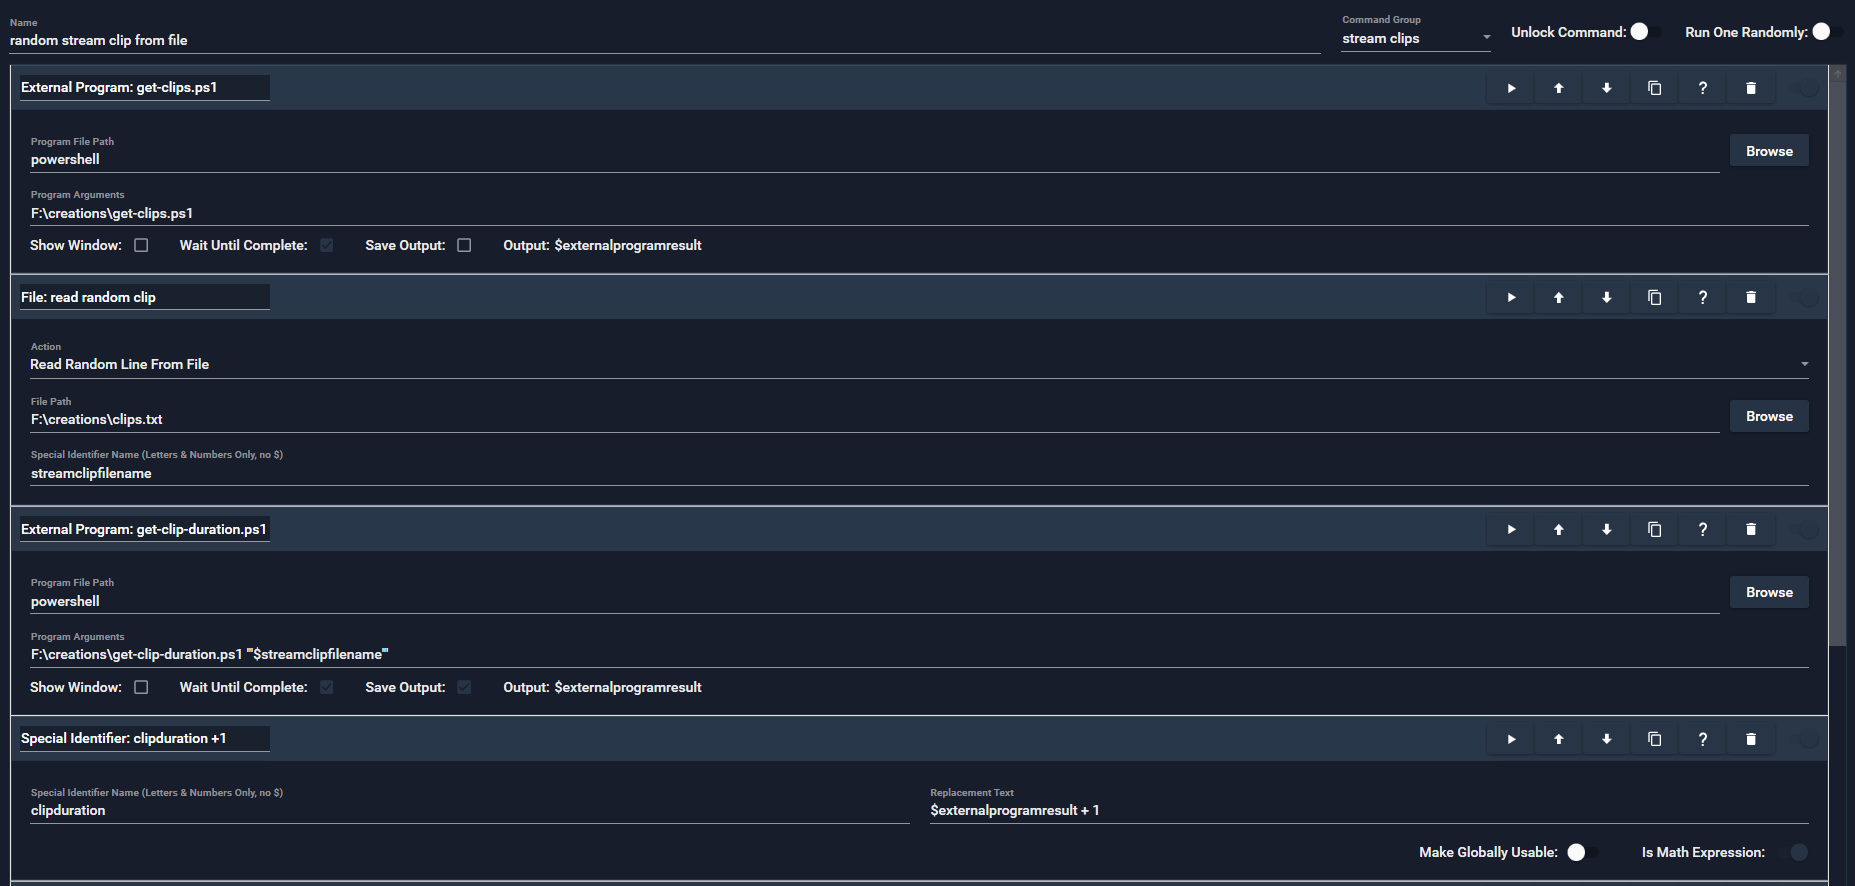
In the External Program action, the “Program file path” is
powershell and the Program Arguments field is set to
F:\creations\get-clips.ps1.
Note: I had a strange issue once where I had to set the External Program
to C:\Windows\sysnative\WindowsPowerShell\v1.0\powershell.exe. I’m not sure
why that is but it worked where powershell didn’t.
The reason that I’m using a file like this is that I can use MIU’s built-in “Read Random Line From File” action to get the file name for the video I want to play. The challenge is that MIU doesn’t wait until the video is done playing before moving on to the next step. That means a “Wait” action is needed.
You can set a static value for the Wait action that’s longer than your longest video. If you know all of your clips are less than 60 seconds, you can set your wait for 60 seconds. Unfortunately, if you do that, what will happen is that your video will play, then MIU will sit there until the 60 seconds are up before starting the next video.
Fortunately, the Wait action can use a Special Identifier to set the
duration. All we need to do is get Windows to tell us how long the
video is. This ugly, little bit of powershell, which I called
get-clip-duration.ps1 can get that and will print the duration in
seconds.
param($clip)
$file = gci $clip

$shell = New-Object -ComObject Shell.Application
$oFolder = $shell.Namespace($file.DirectoryName)
$oFile = $oFolder.ParseName($file.Name)

#$oFile | fl -Property *

# column 27 has file duration
$durCol = 27
$duration = $oFolder.GetDetailsOf($oFile, $durCol)
$timespan = [TimeSpan]::Parse($duration)

#$timespan | fl -Property *
Write-Host $timespan.TotalSeconds
The script output is important because MIU’s “External Program” action
stores that output in an SI called $externalprogramresult. That SI
can then be used to set the Wait time. (I actually take that time and
add one second to give just a little bit of a pause between each
clip.)
In the External Program action, the “Program file path” is
powershell and the Program Arguments field is set to
F:\creations\get-clip-duration.ps1 '"$streamclipfilename"'.
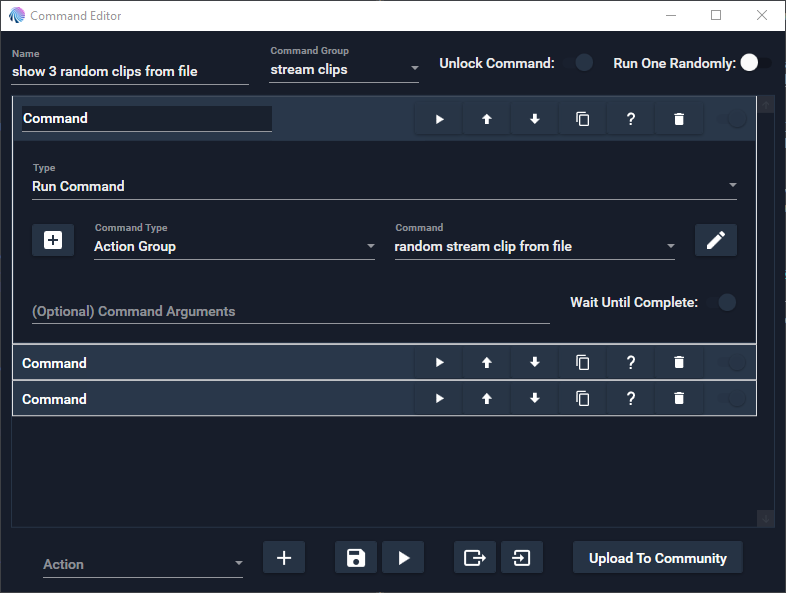
Here’s what the first part of the Action Group looks like. Remember to change the paths to the powershell scripts to match what you named them on your computer.
Notice that I run the script to generate the list every time this command is run. That’s probably a overkill since it’s unlikely that the list is going to change while you’re streaming. Instead, you could put that action in your Stream Start event to create the list when you start streaming. It’s up to you.
One thing to note, Windows may not let powershell scripts run due to the default execution policy. When run through MIU, the file with the list of videos won’t be created and the wait time will always be one second. If you run the script manually, you’ll get the following error.
F:\creations\get-clip-duration.ps1 : File F:\creations\get-clip-duration.ps1 cannot be loaded because running scripts
is disabled on this system. For more information, see about_Execution_Policies at
https:/go.microsoft.com/fwlink/?LinkID=135170.
At line:1 char:1
+ F:\creations\get-clip-duration.ps1 'F:\creations\twitch clips 2021090 ...
+ ~~~~~~~~~~~~~~~~~~~~~~~~~~~~~~~~~~
    + CategoryInfo          : SecurityError: (:) [], PSSecurityException
    + FullyQualifiedErrorId : UnauthorizedAccess
You can change the default execution policy by running the following command as an administrator. You may need to reboot your computer after making that change.
Set-ExecutionPolicy -ExecutionPolicy Unrestricted
You can also set the Execution Policy when the command is run by putting
-ExecutionPolicy Unrestricted at the beginning of the Program Arguments
field.
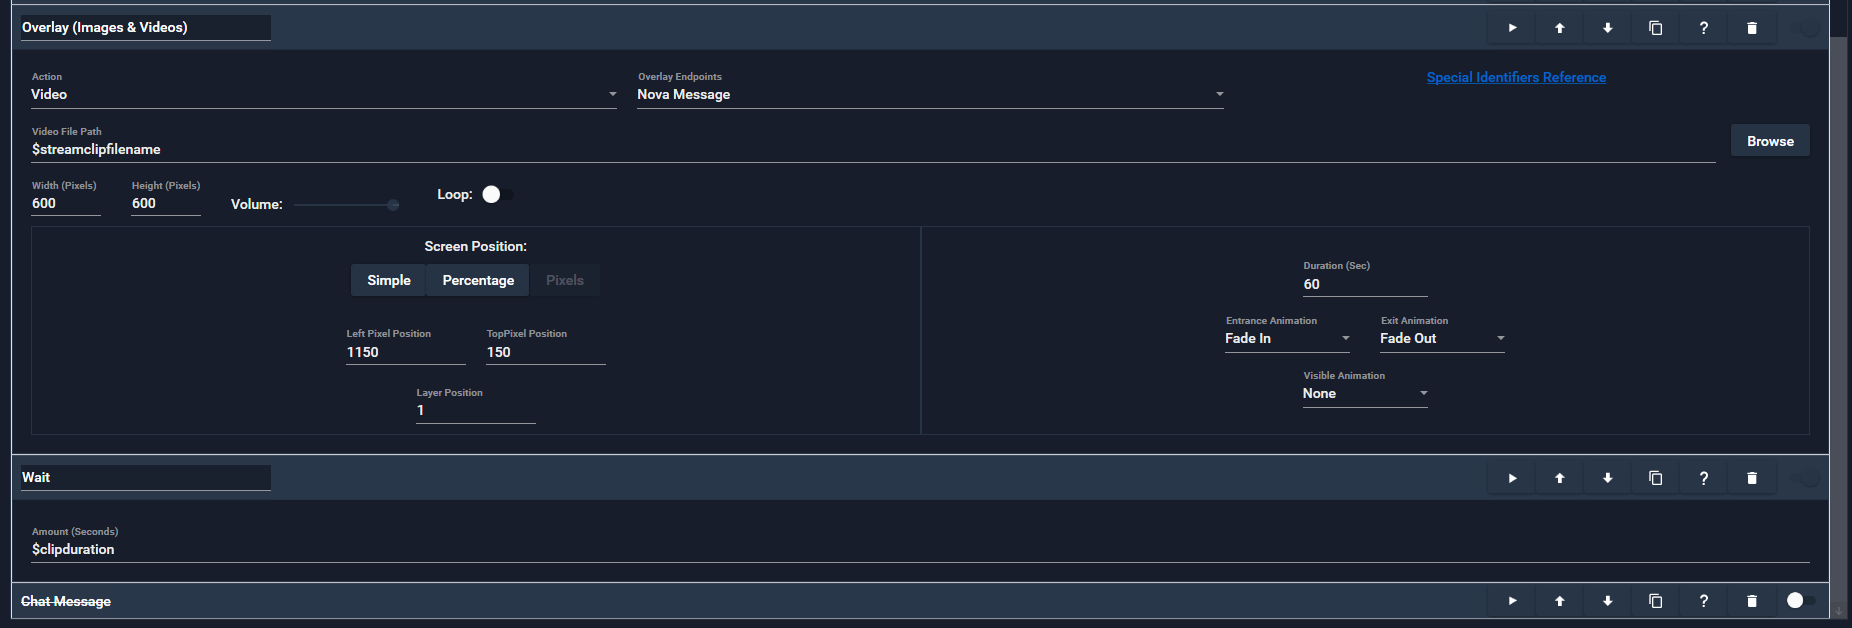
Now that we have the clip name and the clip duration, we can use those values in a Overlay and Wait actions, respectively.
There’s just one fly in the ointment. The Overlay action requires that you set the duration of the overlay. No big deal but you can’t use a SI there. This is where that “mostly” comes it.
What I do is set the duration to be as long as my longest clip. In my case, that’s 60 seconds. The video will play and then remain on the overlay for the full 60 seconds. However, the next videos that play will be placed on top of the previous one. As long as the videos are all the same size, it will look like the previous video goes away and the next one plays. It’s a bit of a kludge but it works for me.
Here’s the bottom portion of the action group that shows the Overlay and Wait actions.
The last thing to do is create an Action Group that runs your new random clip action as many times as you want. The easiest way it to simply add your new AG as many times as you need.